Thursday, July 7, 2011

July Visitors

What a sensational Independence Day weekend!  I slept in until almost 10:00 AM this morning, waking up feeling like an kid who was tuckered out from a big dose of play. 

My family flew down for a Denver visit packed full of sight seeing, beer tasting, restaurant exploring, firework gawking, and mountain driving. Truth be told, my first impressions from earlier this month of the downtown district was that it lacked a certain vibrance that Minneapolis and Madison seem to hold. However, after a few short days with Team Nuss I have gained a newfound appreciation for the area.  For example, there are brick building flanked with painted advertisements that date back to the early 18th century; there are tap rooms and breweries pulled away from the hot sidewalks that are gorged with various beers by the barrel; there are small bike-repair shops and bookstores that have unadvertised coffee bars. Perhaps I was a bit quick to make my assumptions about the city. A few of my favorite memories from the weekend are shared in the pictures to follow... 

Making the hot journey across Denver's concrete jungle
to a watering hole.  Hello refreshing beers at
the Great Divide Brewery!
Cheers to these wonderful urban explorers. It's a keeper.
We went with the 3 for $3 samplers that were served in these
fun glasses. In the end, I think we managed to sample
each of their beers on tap, including ones
that weren't listed on the menu. 
Brewery tour shenanigans...
Drinking beer while learning about beer is probably
the best way to approach brewery tours.
Good thinking, Mickie.
Who would have thought the brewers to be such creative
artisans too. This is a funny picture we found
hanging behind a door (I guess we were really paying
attention to the tour guide).
Joe joined us for dinner at one of our favorite
Uptown restaurants.  Joe and I found this place our first
weekend to Denver and decided it would make a good
first for the family as well. We got outdoor seating
and stuff-yourself-silly grub.
What are in those copper mugs that everyone seems to be
drinking? Why, its a moscow mule of course!
An oldie but a goodie that the mixologists at Steuben's
brought back from the 50's. Apparently the copper mug
keeps the lime zesty and the cocktail consists of vodka
and ginger beer on ice. According to our server, this drink
created a good way to use up excess ginger beer
(a popular drink during prohibition) and the name comes
from the common thought that vodka is a Russian product.
We went with multiple straws so that everyone could get a taste.  
We spotted one of those rare, giant blue bears that roam
wild in Denver. This one looks hungry... 
The Bike Doctor hooked us up with four bikes for the
weekend. Walking would have made it too difficult to
see everything we were hoping to see in the big city.
We are on Wynkoop Street (Coor's Field in the background)
trying to find some cold beer. It was another
summer day in the 90's. Where was this heat coming from?
The Falling Rock Tap House.
We had high hopes from the internet reviews
on this place, for example that they carry
~100 beers on tap daily. Maybe it was the heat but
this place was even better than we could have imagined.
We sat in unoccupied leather couches and watched the
 Rockies vs. Royals game with cool air and frosty, strong beer. 
Look! Dad is on TV!!
More wild animals roaming the streets.
Mike, pick on someone your own size will ya! 
Dinner at the Appaloosa Grill on 16th Street Mall.
What a good looking crew.
Fireworks show accompanied by the Colorado Symphony Orchestra.
Having our bikes for this was awesome (no parking mess).
Finding 3D glasses was even more awesome.
Estes Park, Trail Ridge Road on Independence Day.
You can't leave Colorado without experiencing the Rockies.
We stopped for a late lunch in Lyons on our way to Boulder.
 It was a funky joint in a small town but I will recommend
it to anyone I know going to the Estes area. They had massive
portions and delicious beer (they brew Oskar Blues). I had a pint
of "The Gubna" and this was probably my favorite beer of the
weekend.  Come to find out mid pint its about 10% alcohol... wow,
food coma + altitude + strong beer = deep desire to nap. 
Mike finishing the massive stuffed burrito.
In my opinion there should have been streamers and balloons,
or at least a pat on the back from the waitress.
Good thing mom got him this t-shirt that says, "Chub It"
below the flying pig (referring to their "Old Chub" scotch ale).   
Taking a stroll down Old Pearl Street in Boulder.
All of these adventures in three days... no wonder we were pooped out!

Come back soon!


Looking back, I can't really describe what exactly I thought Denver was missing. Maybe it has something to do with the fact that the 16th Street Mall (the iconic main street connecting Civic Center Park to the Union Station) is flanked with commercial shops and restaurants, like the Cheesecake Factory and Forever 21. Where are the Denver originals? Where can I experience something unique to this downtown that I can't find in another metropolis? Market Street and Larimer Street, which cross 16th Street towards the north end, seemed to be teaming with unique dining spots and boutiques, but with a voracious cost!  Wow. Does this make me a pessimist? Have I turned into a dining snob? Today I just read an article in the Westward magazine about Theo Adley, the chef at the Pinyon in Boulder, and it made me chuckle. He discussed this very issue with Denver's food scene:

"Being called "America's Foodiest Town" by Bon Appetit was the biggest disservice ever paid to the Boulder/Denver dining scene... I think the title has made us complacent. It made everyone feel so f***ing good comfy... Most people shop at farmers' markets to show off their dogs, not because they actually want to stock up on food..."

Maybe I wasn't crazy to think there should be more chefs like Theo. I scribbled "Pinyon" on my list of restaurants to try before the end of the year. 

Other reviews from Denver "foodies" that may provide as a decent road map for an introduction to dining in the Mile High City.  

Friday, July 1, 2011

Memory Lane

It is a beautiful Friday evening before Independence Day. What is it about Denver's consistently hot, sunny summer days without humidity or bugs? Amazing. Sometimes I have to pinch myself and say, "Emily. Yeah. You are really living here!" Not only that, but I get three whole months to do whatever my heard pleases (before putting on my responsible pants and finding a job)! Today I stumbled across old photos from my trip to Italy in 2006, when I was a freshman in college nearly seven years ago. I remember it so well... somehow four gals from floor 10 of Sellery Hall decided to embark on a two-week summer adventure in Italy, hopping from one town to another with a tour group called, Contiki. I spent my entire savings on that trip and spent the rest of the summer working three jobs to make up for it. Instead of describing the dinner I fixed last night, I want to share a few of my favorite memories from that trip.

P.S. Happy 4th of July! My family is visiting from Minneapolis so I'm sure I will have some fun food stories to tell next week. Ciao bella.

Sensory overload at St. Paul's Cathedral.
This was the ending to almost an entire
day of touring historical sites in Rome. 
Gelato poured out of every crack in the city streets.
The great thing about Italian gelatorias is that they will
dish you up multiple flavors in one scoop if you ask.
Perhaps the most memorable part of gelato tasting was the utensil
they give you to eat it with: a small, neon-colored plastic shovel. 
Wandering the streets of... some Italian city I can't remember...
on a night when every Italian was crowded around cafe and pub
TVs to watch a soccer match. We found dinner at this take out joint
that served giant slices of cheesy bruschette for only 1 Euro!
We were so happy to find affordable grub!
Wine tasting (or fantasizing)!
Perhaps my favorite afternoon of the trip because we got to tour a
Tuscan vineyard where we learned about Chianti Classico. 
At the top of the Duomo in Florence. 
Being a tourist in Pisa.
Help! It's leaning!
More gelato!
All of us Westerners became totally addicted...
Hands down, the most authentic and delicious meal I had on the trip.
I wish I could tell you about what we ate but I think I drank
a whole bottle of wine by the end of the five-course meal.
The two people dressed in green vests were some of our servers,
and looking at this picture now makes me realize that they were
just thrilled  to host a bunch of loud Americans and Canadians. 
Cappuccino heaven in Venice.
If there is one thing Italians like more than good wine,
it's strong espresso.  The espresso bars in the AM is like a flock
of buzzards on prey. There are no take-away plastic cups or tables
to sit down, but instead you get your espresso cup,
stir in a packet of sugar, take it back and jet!
The last supper in Rome, shared by the four Madison gals from
Sellery 10B.  I loved this night because, for once, we didn't
look at the price on the menu. After this, we blew the rest
of our Euros on some Italian beers...
Good Bye Italy! I hope we see each other again!

Lessons I took away:
1) Italians don't eat spaghetti with a fork and spoon. Just fork. None of this twirl-it-in-your-spoon business.
2) Cheap wine is still cheap wine.
3) At restaurants, bread is served with oil and salt, if anything. They rarely eat it with balsamic vinegar like we do here in the States.
4) Dessert is often a piece of fruit, ripe and juicy and sweet.
5) Restaurants close down from about 3:00 PM until sometimes 8:00 PM so stagger your appetite accordingly.
6) Meals often last for hours.
7) Families and neighbors eat together.
8) The food is truly inspiring and makes you feel alive.
7) I need to learn how to cook and eat like Italians!

Thursday, June 30, 2011

Italy Part 4

Roasted balsamic onions (p. 98)
This was an afternoon project last week, thinking it would be nice to have a cold jar of sweet roasted onions in the fridge for easy snacking. What a strange, but simple recipe I will make again!

The recipe requires small "pickling onions" ranging from 0.75 oz
to 1.25 oz, shown above.  I could only find onions of similar
description labeled, "boiler onions."
Aren't they the cutest bulbs you've ever seen? 
The best part of this recipe is that
you don't have to peel them! You just throw them into
a baking dish and then throw them into a preheated
oven (315 degrees F).  I spent the whole hour and a half
roasting processes nervous that I was going to have
an oven full of flaming onion balls, but in the end
I guess the paper exterior isn't flammable. Whew!
While the onions were roasting, I made the marinade
(the jar in the front). It consisted of mixing together
good quality balsamic vinegar with a spoonful of soft
brown sugar. I'm not exactly sure what "good quality"
balsamic vinegar means, but I chose an Alessi's brand
specifying Aceto Balsamico di modena aged 4 years in wood.
After the sugar is dissolved in the vinegar, add the olive oil
and shake the jar like crazy to get a homogenous solution.
I find it helpful to sing Outkast,
"Shh shake it, shake, shh shake it... shake it like a polaroid picture..."
Roasted and ready for peeling!
I had one fatality out of the bunch (upper right corner).
Cause of death: explosion.  

Now for the peeling process. This was actually fun because it was like unwrapping tiny pearls hidden in ugly, sticky wrapping paper. When I first pulled them out of the oven, I thought I had overcooked them beyond repair. The seemed deflated and burned. However, under the tattered peels, there lies unharmed soft, white onions waiting to be... eaten!

An example of how ugly they look at first. But...
... peel the layers away and.... 
... you find a beautifully cooked mini onion.
Sweet and juicy and ready to eat (or for marinating as this recipe calls for).
Place all of the peeled onions in a sterilized jar.
To do this, rinse with boiled water and let dry in a warmed oven.
I used my kettle (to the right) for easy-to-pour hot water, timing it so that
I could place the jar into the oven right after removing the onions.  
Add your marinade after another few quick shakes and then let it
rest in the refrigerator until the next day. The recipe says that at
this point, these onions remain good for three weeks.
Reminder: give the jar little shakes if the marinade separates
with time (oil can be so mischievous)!
Picture perfect :)
Serve along side a fresh salad, crispy crackers and soft cheese. 

Wednesday, June 29, 2011

Italy Part 3

Yesterday, I spent nearly the entire day in the kitchen. Barefoot, hair pulled up in a high pony, red apron tied around my waist, NPR podcasts streaming from my laptop... this is my happy place. Let's start this story at the end with the table spread of Tuesday night's dinner for two. On the menu for the evening: 
Pappa al pomadoro (p. 105)
Parmesan & rosemary crusted veal chops (p. 130)
Salsa Rossa (p. 130)
Rocket and pecorino salad (p. 105)
Lemon granitas (p. 147)

The finished fruits of my labor! I love how beautifully balanced the colors, textures,
and tastes that this meal encompasses. For starters, we dished up a hearty bowl of the
tomato and bread soup, followed by the main entree of pan-fried veal chops with salsa rossa, and
finished with a plate of arugula and shaved parmesan (pecorino) to cleanse the palate
and settle the stomach before dessert. 

I began my dinner preparations with the last course: Lemon granitas! I had to make a quick run to the grocery store down the street to pick out a flat, wide metal dish for freezing the liquid lemonade. This is key, otherwise it can tense up into a thick, stubborn frozen mess that is difficult to manage for the final steps explained later. First, these granitas required a cooking step to liquify the sugar into the lemon juice. Then water is added and the liquid solution is stirred and cooled. Once cooled, the solution (much like lemonade) is poured into the metal pan, covered, and put into the freezer. There is now a series of ice crystal raking steps to get the desired slushy, flakey texture of an Italian granita! 

Preparing my lemon granita concentrate. To do this, heat lemon juice, fresh lemon zest, and caster sugar in small sauce pan until the sugar has melted.  A little word of advice... do not buy caster sugar at the store because it is priced at a ridiculous cost for what it is worth. Caster sugar is just a super fine granulated sugar. It is useful because it mixes with liquids faster than regular granulated sugar because of its higher surface area. To make your own, just pulse granulated sugar in your food processor a few times. Note: do NOT confuse caster sugar with powdered sugar. Powdered sugar is very, very finely ground sugar with added corn starch, usually, to keep the granules from sticking to each other. 

First rake! Still very viscous. Be careful moving yours in and out of the freezer in the early
steps because I almost had a few accidents that would have made for a very sticky cleanup. 

Pappa al pomadoro (Tomato and bread soup) came next. For this dish, head to your local market the day before a pick out a hearty loaf of Italian bread and then leave it out overnight to dry out a bit. I left mine out of the bag to accelerate this process since I purchased my bread fresh and the texture seemed extremely moist. If you want to prepare this recipe the same day, ask the store bakery if they have any day-old stuff and let it sit unwrapped until you add it into the soup. 

This is my share of fresh bread from the store, working very hard on becoming dry and crusty! I noticed after I got home that I had grabbed a French load instead of an Italian loaf. Oops. To be honest, I'm not sure if there is much difference between the two types anyways, except that Italian bread tends to be a bit more soft and spongy (from addition of a bit of olive oil or dairy to the dough). Any bread enthusiasts out there that can explain it to me?

The next steps of the soup involved ingredient preparation with a bit of love, such as for the tomatoes. The tomatoes needed to be bathed in boiling water for 10 seconds followed immediately by a dip in ice cold water. Their bottom sides were scored before the bath, allowing for an easy starting point to peel away the outer skins. Once they were properly bathed and naked, it was time to cut them in half and remove their insides (the gooey seed slime) with a small spoon. The final step, as if they had not been tortured enough, was to chop them roughly.  The following pictures go through this in more detail.

The hot-cold bathing process allowing for easy peeling
 (please excuse the cook's poorly groomed fingernails).
The hallowed tomato remains ready for chopping. Despite how red and ripe their flesh looks, their seeds were not easy to remove. This is a result of the supermarkets' desire to expedite the ripening process of many fresh produce (such as tomatoes and bananas to name a few). They commonly gas them with a chemical agent, known as ethylene, while they are shipped in crates from field to market. This is different than how a plant naturally ripens. For example, have you ever been allured to purchase a bright red tomato that appears to be juicy and sweet, but then you get home and cut it open and it is still bitter, pallid, and hard?  This is because of ethylene. The outside appears ripe but the inside has not had adequate time to naturally mature its texture and taste.
More ingredient prep, including adding the chopped tomatoes and tomato paste to the sauce pan to reduce while measuring out vegetable broth, and de-crusting and cubing of the dry bread.
Once the broth has simmered with the tomatoes for about half an hour, it is time to add the bread cubes! This almost reminding me of my younger years of adding small sponge capsules to hot water to wait to see them fatten into dinosaurs or animals. I didn't know what would happen to the dry bread crumbs but they devoured the broth and grew into large dumpling mush balls. I had to add about 2-3 extra cups of water to the pot maintain its integrity as soup. Final step was to add freshly torn basil leaves and olive oil drizzle.

As the tomato soup simmered on the stove, I prepared the Salsa rossa that would be served along with the Parmesan and rosemary crusted veal chops. This was an easy recipe to complete and required only a few ingredients: onion, red pepper, canned tomatoes, olive oil, chili pepper flakes and salt. There were equal parts onion and red pepper. The onion slices needed to be very thin while the red pepper slices could be about 1 cm thick. The onions were added to the hot oil first to soften but not brown, and then the red peppers were added and cooked to reduce to half the original size. This reducing step took the longest, requiring about about 30 minutes over low-medium heat to keep the vegetables cooking but not browning. 

The onions and red peppers cooking to half their size. Reminded me of my Alma Mater colors.
I wonder what Bucky Badger is eating for dinner tonight...

While the Salsa rossa and soup were on the stove, it was a good time to begin the preparation of the veal chops. It included a new verb, sinew, for which I had never heard of before. From the quick google search that I did, I took away that "sinew" means to get rid of all pieces of the chops that are difficult to chew or uneatable. The chops that I purchased came as T bones, so I carefully pulled the meat away from the bone center to get four pieces of meat. After cutting away excess fat, tendons, other small "sinews" and patting dry with a paper towel, I was left with some handsome, and fairly lean, veal!  After some smashing with a mallet (to 1 cm thickness) they were ready for a 2-step batter process. Step 1: dip in seasoned, slightly whipped eggs. Step 2: Press each side firmly into a breadcrumb, parmesan, and fresh rosemary mixture.

The chops from King Soopers! This was my first time purchasing veal,
and for some reason I was expecting something that the butcher keeps
 behind the glass case. I didn't have time (or a vehicle) to shop around
elsewhere so I took them at face value.
By this time, the Pappa al pomadoro was taken off the stove, the Salsa rossa was simmering on low with the tomatoes and spices, the table was set, and my wine glass was empty. Almost time to feast.... just needed to fry the veal chops. While the butter and olive oil were heating with garlic cloves in a large frying pan, I whisked together olive oil, lemon juice, and salt and pepper for the Rocket and pecorino salad and set aside. When the garlic cloves started to brown, I quickly booted them out of the pan and added the battered veal chops, two at a time, into the hot fat bath. As they sizzled and cracked I tossed the washed and dried arugula leaves with the vinaigrette, divided between two salad plates and placed it onto the dinner table. A quick flip of the chops after 3-5 minutes and it was time to tend to the granitas one last time (pictured below), raking the zesty ice crystals away from the sides of the cold pan into a fine texture. With a deep breath of cold freezer air as I put the pan of granitas back, it was time for the final round of veal chop frying. The first came out beautifully and reminded me of Joe's mother's Slovak pork schnitzel.

The third rake before letting it freeze one more time while
 dinner is consumed. The flaky, solid texture has almost
been reached as you can see.  

Fast forward to the end of the meal. Plates are empty, bellies full, kitchen a mess. Time for a slow Italian stroll around the block to escape the heat of the apartment (made especially unbearable by me having at least two burners on at all times throughout the course of the afternoon). Before our return from a wonderful night in Italy, we decided on a night cap. Not another glass of wine, but a tall helping of sweet and sour lemon granita that was waiting behind freezer doors. This might just be a staple in our apartment for hot summer nights like this one.

Ice cold Italy.... the Lemon Granita!

Monday, June 27, 2011

Italy Part 2

Joe finished his first night shift at the hospital on Friday morning. While he slept, I was happily buzzing around in the kitchen. I wanted to make something special for him that would be refreshing and fun. I decided to go with four recipes from Italy, listed below. I'll let the pictures do most of the talking for this entry.

Napolentana Crostini (p. 95)
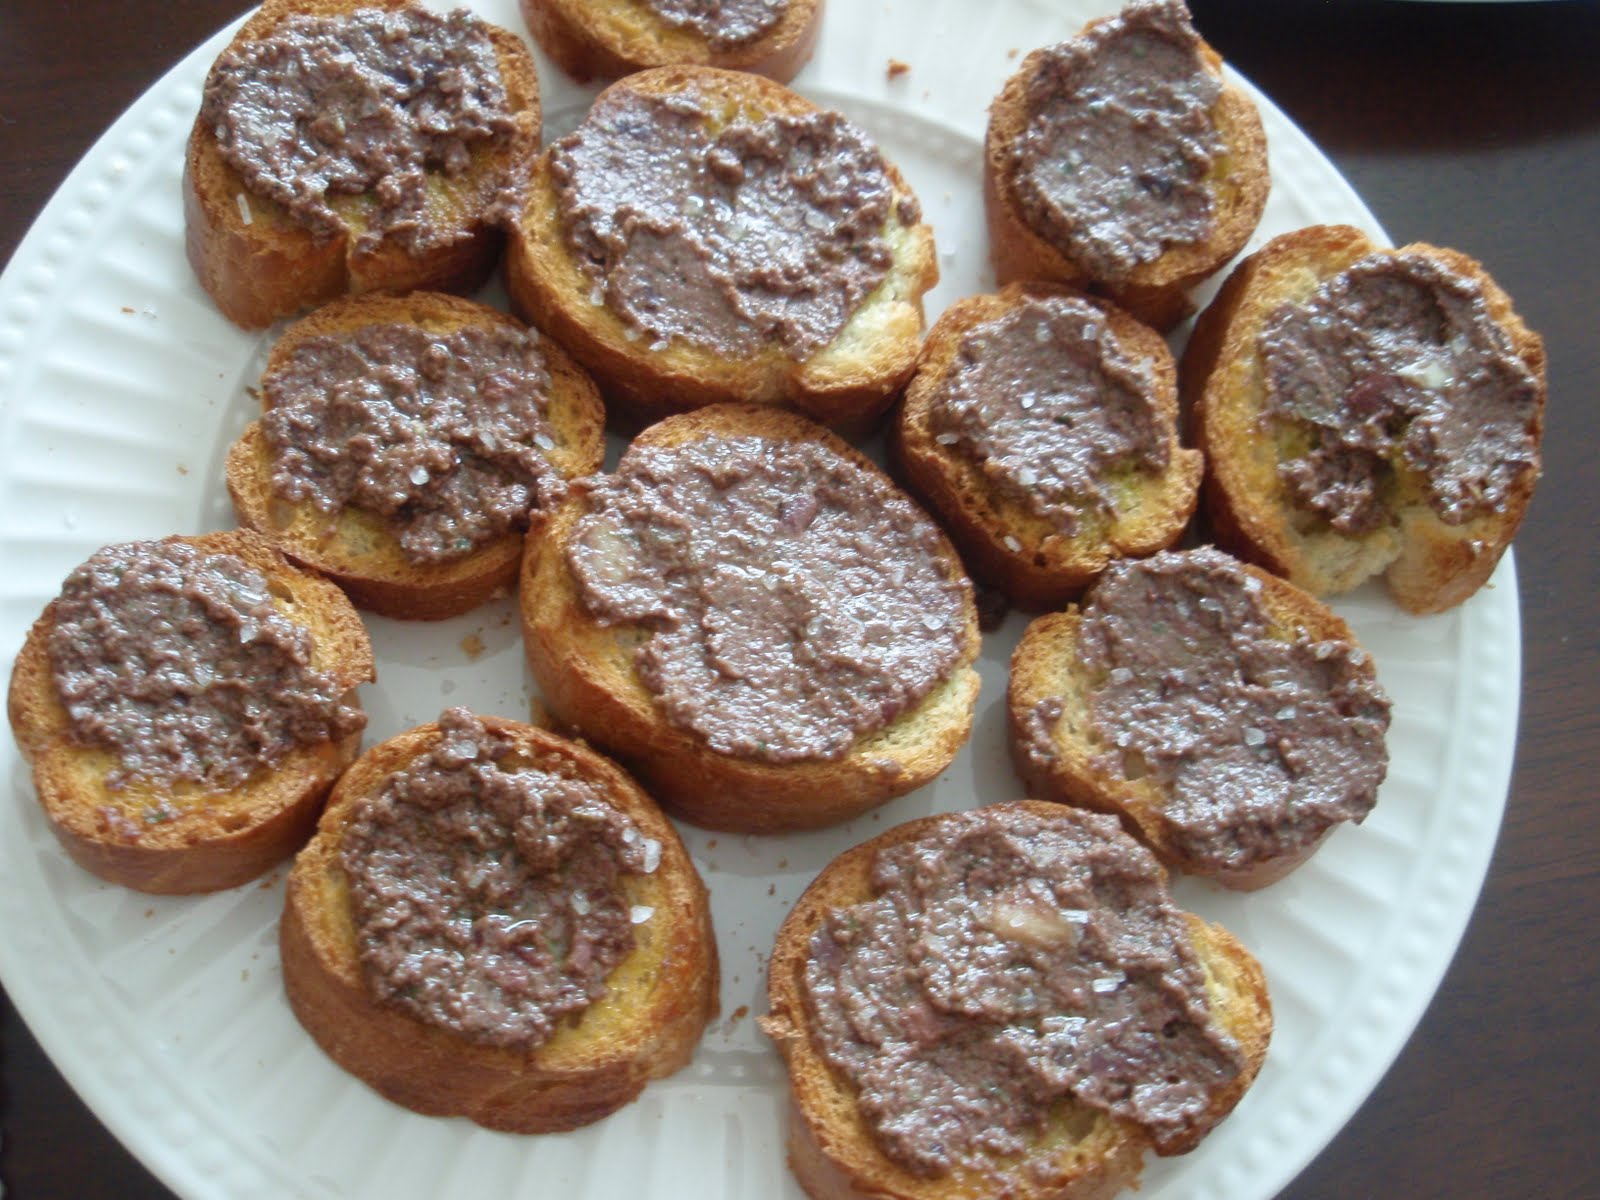
Olive Crostini (p. 95)
Tuna and Cannellini Bean Salad (p. 101)
Chimneysweep's Gelato (p. 149)


Premature Napolentana Crostini consisting of a generous frosting of
butter and two slices of bocconcini cheese. They need further assembly with halved
anchovy fillets, peeled and seeded tomato slices, dried oregano, and fresh
cracked pepper before going into the oven (350 degrees for about 15 minutes). 
The lonesome remaining Bocconcini. This recipe introduced me to this type of cheese.
I stood in front of the cheese cooler at the supermarket for about half an hour reading cheese labels to find it.
Turns out, Bocconcini is an unripened cheese packaged in whey
 (a liquid milk protein solution you see in the picture), nicknamed "baby mozzarella."
The texture is very smooth and creamy, and oddly, a bit juicy.
The taste is super mild, almost like solid milk without any singing notes of sour, salty, or sweet. 
Napolentana Crostinis ready for tasting. See how the bocconcini melted into a
 creamy goo that sort of binds the other ingredients to the bread? Neat. 
Admiring the tranquility of this scene.
The finished Olive Crostini. These required a different preparation. The bread was
toasted in the oven first (375 degrees for about 3 minutes each side), and then
topped with an olive spread. The spread consisted of blending Kalamata olives,
anchovies, capers, garlic, basil, and olive oil until finely chopped but not smooth.
I sprinkled them with a bit of sea salt to finish. 
There were four crostini recipes altogether but I figured I would make two this evening.
I like the balance of color and texture with these two recipes. 
Now onto the tuna salad! This was my first time trying to grill without having a grill!
I decided to take a chance and use my cast iron panini press grill. I let it heat up in the oven while
the crostini baked, then placed it over low heat on the stove top to sear the tuna.
The tuna steaks were marinated with olive oil and cracked pepper for about an hour before "grilling."
I was biting my nails as to not overcook them. This pictures shows the last steps of getting the edges seared. 
O.K. so they are a bit over done but not a terrible first attempt at seared tuna on a stove top!
Even so, Joe was a bit hesitant at trying this pink meat. I assured him that they are
100% safe since we cooked all outer surfaces. In fact, the ideal tuna steak is seared
so minimally that the inner meat appears dark purple (raw raw raw).  
Final steps of assembly required laying a fresh bed of arugula, and topping with pre-mixed spices and
freshly chopped red pepper, tomatoes, cannellini beans. The dressing was served warm after simmering on the stove.
 It consisted of lemon juice, olive oil and honey. Garnish the plate with fresh cracked pepper, salt, and lemon zest! 
Aerial view of the Tuna and Cannellini Bean Salad. How refreshing does that look?
I read that the tuna industry in Sicily is very important for the economy of southern Italy. 
Final course was a sort of "gelato" cocktail, the Chimneysweeper's Gelato.
For this, we used one of our new favorite wedding gifts: the Cuisinart ice cream maker.
I'll blog about ice cream later but for the base of this recipe, we made a very rich ice cream
consisting of mostly whipping cream and sugar with a slash of vanilla and a pinch of salt
 (the recipe calls for vanilla gelato but it noted that a premium ice cream could be used also).
The Cuisinart at work! It takes only 15-20 minutes for the sweet dairy concoction to solidify.
Our apartment was so warm that evening that seconds after dishing up the frozen treat,
it started melting into a sloppy slush. Quickly, we drizzled the ice cream with whisky
and sprinkled with finely ground coffee beans. Unfortunately I don't have a decent
 picture (probably didn't snap one since it was so sloppy).  But you must realize that this is the most delicious
finish to a busy day! We enjoyed ours while watching Avitar in front of two floor fans...

Sunday, June 26, 2011

Sublime Limas

This entry is a little distraction from Italian cuisine, but I had to share it because it is so delicious and wonderful for pairing with grilled summer meats. The following recipe was adapted and modified from www.culinate.com by substituting lima beans for fava beans (very easy since limas can be purchased frozen), and adding some chopped red onion to the hot pancetta. 

Sublime Limas
3-4 Tbsp olive oil
3 oz. pancetta, chopped into small bits
1/2 cup red onion, sliced or chopped
3 cups lima beans
Handful of mint, chopped
Salt to taste

Heat oil in a large skillet over low-medium heat. Add pancetta and let it cook until it starts to get a little bit crispy. Add the red onion and let these ingredients sizzle another 10 minutes, stirring occasionally. Add lima beans and cook another 10 minutes, or until beans are heated thoroughly and so that the skins start to caramelize slightly (light brown color). Turn off the heat! Add mint and salt to taste and serve immediately with grilled seafood, pork or lamb and sourdough bread (or at least that is my personal opinion). Leftovers, even cold, make for an easy lunch the next day.
This was my first time cooking with Pancetta and
before I started to chop, I had a moment of admiration
of its delicate rolled layers of fat and muscle. Pancetta is known
as Italian bacon- salt cured and lightly spiced. 

Pancetta and onions unite! There is something so comforting
about the smells and sounds of sizzling onions in meat fat.
The final ingredients have jumped into the pot. Just stir and serve! 
I was a bit nervous about the taste of this dish since we added
mint to an entourage of salty-savory ones. But the result was fantastic.
Next time you buy mint for mojitos, be sure to pick up some
lima beans too!