Monday, June 27, 2011

Italy Part 2

Joe finished his first night shift at the hospital on Friday morning. While he slept, I was happily buzzing around in the kitchen. I wanted to make something special for him that would be refreshing and fun. I decided to go with four recipes from Italy, listed below. I'll let the pictures do most of the talking for this entry.

Napolentana Crostini (p. 95)
Olive Crostini (p. 95)
Tuna and Cannellini Bean Salad (p. 101)
Chimneysweep's Gelato (p. 149)


Premature Napolentana Crostini consisting of a generous frosting of
butter and two slices of bocconcini cheese. They need further assembly with halved
anchovy fillets, peeled and seeded tomato slices, dried oregano, and fresh
cracked pepper before going into the oven (350 degrees for about 15 minutes). 
The lonesome remaining Bocconcini. This recipe introduced me to this type of cheese.
I stood in front of the cheese cooler at the supermarket for about half an hour reading cheese labels to find it.
Turns out, Bocconcini is an unripened cheese packaged in whey
 (a liquid milk protein solution you see in the picture), nicknamed "baby mozzarella."
The texture is very smooth and creamy, and oddly, a bit juicy.
The taste is super mild, almost like solid milk without any singing notes of sour, salty, or sweet. 
Napolentana Crostinis ready for tasting. See how the bocconcini melted into a
 creamy goo that sort of binds the other ingredients to the bread? Neat. 
Admiring the tranquility of this scene.
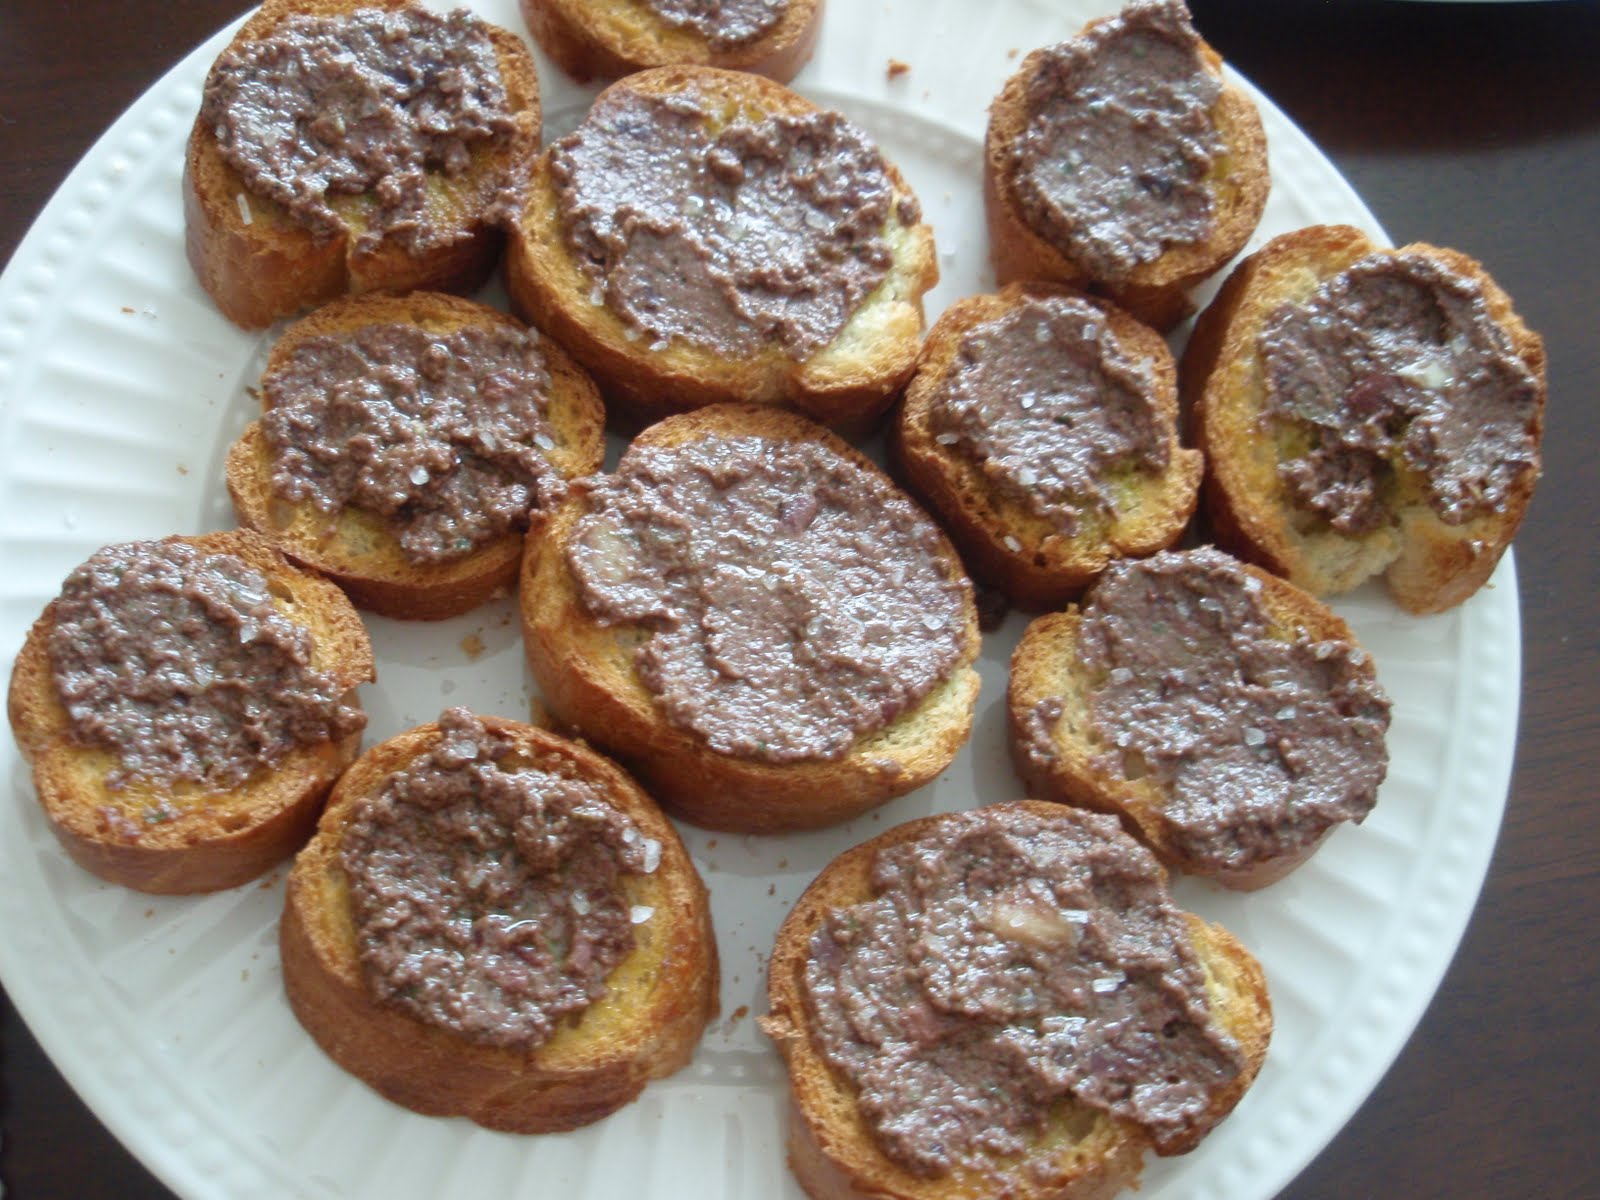
The finished Olive Crostini. These required a different preparation. The bread was
toasted in the oven first (375 degrees for about 3 minutes each side), and then
topped with an olive spread. The spread consisted of blending Kalamata olives,
anchovies, capers, garlic, basil, and olive oil until finely chopped but not smooth.
I sprinkled them with a bit of sea salt to finish. 
There were four crostini recipes altogether but I figured I would make two this evening.
I like the balance of color and texture with these two recipes. 
Now onto the tuna salad! This was my first time trying to grill without having a grill!
I decided to take a chance and use my cast iron panini press grill. I let it heat up in the oven while
the crostini baked, then placed it over low heat on the stove top to sear the tuna.
The tuna steaks were marinated with olive oil and cracked pepper for about an hour before "grilling."
I was biting my nails as to not overcook them. This pictures shows the last steps of getting the edges seared. 
O.K. so they are a bit over done but not a terrible first attempt at seared tuna on a stove top!
Even so, Joe was a bit hesitant at trying this pink meat. I assured him that they are
100% safe since we cooked all outer surfaces. In fact, the ideal tuna steak is seared
so minimally that the inner meat appears dark purple (raw raw raw).  
Final steps of assembly required laying a fresh bed of arugula, and topping with pre-mixed spices and
freshly chopped red pepper, tomatoes, cannellini beans. The dressing was served warm after simmering on the stove.
 It consisted of lemon juice, olive oil and honey. Garnish the plate with fresh cracked pepper, salt, and lemon zest! 
Aerial view of the Tuna and Cannellini Bean Salad. How refreshing does that look?
I read that the tuna industry in Sicily is very important for the economy of southern Italy. 
Final course was a sort of "gelato" cocktail, the Chimneysweeper's Gelato.
For this, we used one of our new favorite wedding gifts: the Cuisinart ice cream maker.
I'll blog about ice cream later but for the base of this recipe, we made a very rich ice cream
consisting of mostly whipping cream and sugar with a slash of vanilla and a pinch of salt
 (the recipe calls for vanilla gelato but it noted that a premium ice cream could be used also).
The Cuisinart at work! It takes only 15-20 minutes for the sweet dairy concoction to solidify.
Our apartment was so warm that evening that seconds after dishing up the frozen treat,
it started melting into a sloppy slush. Quickly, we drizzled the ice cream with whisky
and sprinkled with finely ground coffee beans. Unfortunately I don't have a decent
 picture (probably didn't snap one since it was so sloppy).  But you must realize that this is the most delicious
finish to a busy day! We enjoyed ours while watching Avitar in front of two floor fans...

Sunday, June 26, 2011

Sublime Limas

This entry is a little distraction from Italian cuisine, but I had to share it because it is so delicious and wonderful for pairing with grilled summer meats. The following recipe was adapted and modified from www.culinate.com by substituting lima beans for fava beans (very easy since limas can be purchased frozen), and adding some chopped red onion to the hot pancetta. 

Sublime Limas
3-4 Tbsp olive oil
3 oz. pancetta, chopped into small bits
1/2 cup red onion, sliced or chopped
3 cups lima beans
Handful of mint, chopped
Salt to taste

Heat oil in a large skillet over low-medium heat. Add pancetta and let it cook until it starts to get a little bit crispy. Add the red onion and let these ingredients sizzle another 10 minutes, stirring occasionally. Add lima beans and cook another 10 minutes, or until beans are heated thoroughly and so that the skins start to caramelize slightly (light brown color). Turn off the heat! Add mint and salt to taste and serve immediately with grilled seafood, pork or lamb and sourdough bread (or at least that is my personal opinion). Leftovers, even cold, make for an easy lunch the next day.
This was my first time cooking with Pancetta and
before I started to chop, I had a moment of admiration
of its delicate rolled layers of fat and muscle. Pancetta is known
as Italian bacon- salt cured and lightly spiced. 

Pancetta and onions unite! There is something so comforting
about the smells and sounds of sizzling onions in meat fat.
The final ingredients have jumped into the pot. Just stir and serve! 
I was a bit nervous about the taste of this dish since we added
mint to an entourage of salty-savory ones. But the result was fantastic.
Next time you buy mint for mojitos, be sure to pick up some
lima beans too!

Friday, June 24, 2011

Italy Part 1

This challenge was started almost a week ago on a Saturday morning when I unpacked my Mediterranean cookbook. I opened it and was immediately entranced by the pictures it contained, including Involtini of Swordfish and Higas Rellenos. Suddenly, the notion to cook my way through the countries within it enticed my interest. Turning to Joe (who was preoccupied by a youtube ski video), I opened the pages to the table of contents and asked him to pick a country that he would like me to cook through this summer. Without thought, he pointed at Italy. Sounds good to me! Italy it is! 


The Essential Mediterranean Cookbookby Juliet Rogers, Copyright 2005
ISBN 1-74045-776-5
Given to me by my wonderful parents. I love them!
Sample of the text. The picture of the bottom right
shows the Baked Peppers that I forgot to document with my own camera.

Visiting Italy six years ago was my first exposure to European culture. I remember thinking that the smells, people, vegetation and foods were about as colorful as anything I'd ever experienced. I remember thinking I should drop out of college, find a job a random vineyard in the hills of Tuscany, and grow old drinking Chianti and sampling pungent cheeses... oh, the glorious dreams I had! The fact that Joe picked Italy meant I could travel back and retrace fond memories. It was also a good pick because it is the season of summer. Italian cuisine fits perfectly due to simplistic recipes with an emphasis on fresh ingredients.


I chose to start with two recipes: Baked Peppers with Anchovies (page 89) and Spaghetti Puttanesca (page 110). From here on I will reference the page numbers within the cookbook where the complete recipes can be found. Instead of filling space with the recipes themselves (that can sometimes be very extensive), I want to elaborate on details that personalize the recipes, such as cooking methods, kitchen experiences, ingredient descriptions, and so on.

My ingredients for these recipes sat idle for three full days as new activities and social events kept arising that competed with our first Italian dinner at home. Last Monday, I was determined that we could manage both: an early evening on a "peddle hopper" with Joe's fellow interns and a retreat back to our apartment for a late meal of peppers and puttanesca (mostly because I was getting growing concern over the lifespan of my capsicum peppers)! To make this work, I decided to assemble the peppers and prepare the sauce for the pasta early afternoon. That way when we returned home around 8 pm, all I would have to do would be to cook the pasta and bake the peppers while letting the sauce simmer a bit longer. As the night progressed, our fine Italian dinner was substituted for one too many beers (never underestimate a bunch of medical residents about to kiss their summer freedoms goodbye while dressed in funny costumes on a peddle bus...)! We put the food in the refrigerator before retiring for the night.

Late the following morning I was expecting to find pruned, soggy peppers that would have to be tossed. To my dismay, they were just as beautiful as when I had left them the afternoon before! Well, this called for a lavish brunch of Italian fare to cure our sorry selves. I immediately began to preheat the oven and put the final garnishes on the peppers, such as the slivered anchovies and torn basil leaves, as well as put the sauce on the stove to a slow simmer. By 12:30 pm the stove was off and the food was warm.

I regret that I didn't think to take any pictures of the peppers but they were wonderfully caramelized on the bottom with a soft belly that kicked your taste buds with a harmony of salty anchovies and fresh basil. The pasta was also dressed in distinctly Italian flare with the combination of flavors such as Kalamatas, capers, anchovies, fresh parsley and a lingering heat from a few pinches of chili flakes. I quickly discovered that Joe was not thrilled with the olives as they slowly grew into a pile at the edge of his plate (his loss, my gain)!

There are some dishes that are known to be better the next day. I think this Puttanesca sauce is one of them, being that the individual ingredient flavors grew more pronounced during their long slumber in the fridge. I am also happy to note that these recipes can hold up to preparation a day in advance. This may come in handy for future time crunches and convenience. The leftovers of each of these recipes were excellent to the third day (the pasta did soften with time).

A visual sampling of my first pasta (minus the olives since this was Joe's dish).
 Parmesan was added to this dish for a hearty twist for
for lunch, but is not called for in the original recipe.

A bit of fun trivia: Puttanesca comes from the Italian word for whore (puttana). As one can imagine, there are many stories surrounding this dish. Does it stem from the intense flavors of the sauce that charmed men who would eat of it, or did it originate from women who were forbidden to shop for groceries during regular hours and survived on pantry staples (olives, anchovies, etc.)?

Westward Adventures

For the past 1 month, 1 week and 2 days, it seems as though life has been moving faster than I could mentally comprehend; it was almost as if I was watching my days transpire in third person. It all began mid-May when both Joe and I graduated with our graduate degrees in the same weekend. I was sleep deprived and frazzled as our families came to Madison to join us in celebration (probably from higher caffeine consumption to complete my thesis and tie up other responsibilities in the lab before that day). Following that, we had to finalize plans and small projects for our wedding the next weekend, May 21st. Our friends and family began arriving in town as early as Wednesday. After our wedding came a much needed eight days of vacation in sunny Antigua. We successfully managed to catch up on sleep, eat every few hours, and drink our fill with all things fruity that came with alcohol and a straw (sadly no umbrellas). Upon our return, we packed up our apartment and drove to Milwaukee, Minneapolis, and Kansas City for various family gatherings. We arrived at our final designation on the evening of June 7th in Denver, Colorado!

When gawking at the mighty hills seen to Denver's west, we stood
corrected by a local who looked at Joe and said,
"Son, those ain't hills.  Dem's mountains."
We had to twist the smiles off of our faces. 

Denver... the very name bleeds "cool" doesn't it? I think so. Or perhaps it is my resonating excitement to be exploring a new part of the country. Joe started his medical residency training (transitional year) this morning and I am currently, for the first time in my life, unemployed with no ties to academia. My plan from July through August (give or take) is to dedicate my time to getting my creativity back. How am I going to do that? By doing the activities that make me happiest. Spending time with the outdoors and playing with food.


I feel so blessed to have the time (key word, TIME) to explore deeper into the culinary arts. Despite my curiosities of spicy curries, baked goods, and traditional Slovakian meals, I have decided to focus my energy on one arena of food at a time. I'm beginning my adventure in the crooked, bustling market streets threading through Italy! And I'm using my beloved, The Essential Mediterranean Cookbook, as my guide.

Playing in the outdoors together as newly weds. We love
hiking dem mountains! We hope to complete a 14er, which is
climbing a peak of 14,000 ft, by the end of the season!

I have few rules about this challenge but I am taking them very seriously:
1)  No short cuts (no using pre-minced garlic in a can if the recipe calls for you to mince fresh garlic). By taking these extra steps the taste may not be noticeable but it will give me the opportunity to become more practiced with my kitchen tools and techniques.
2)  No budget cuts (if the recipe calls for a Tbsp of brandy in the sauce, but you don't want to buy a $20 bottle of something you know you don't drink, you buy it)! There are always ways to use leftover ingredients or people to give them away to. The goal is to prepare authentic tastes by adding each ingredient in the appropriate quantities.
3)  Enjoy the journey. If a mistake happens, learn from it. Better yet, laugh and sing in the kitchen. Have a glass of wine and put on your favorite album. If possible, share your final products with others to gain feedback (and most likely they will be happy to take part in the eating) and share your final thoughts. I'll be sharing many of mine right here! Salute!

My most frequent product taster (now husband!) after a picnic
dinner at Cheesman Park in Denver. 

Wednesday, April 27, 2011

Academia Bites

You know you are a full-time student when you:


1. Pair Hamburger Helper with wine for a gourmet Friday night meal.
2. Consider a latte to be a lavish expense, and even a cup of black coffee for that matter, but a $6 pint of beer is justified.
3. Fancy your meals standing over a kitchen counter or hovering over your laptop.
4. Emptying out the dishwasher becomes a major time suck.
5. Can't keep enough junk food in the house to supply late study snacking and thus, culinary creations are born (such as Pop tarts dressed in Hershey's syrup for a sweet fix)!
6. Ramen noodles become as versatile as spaghetti noodles, mixing them with peanut butter or marinara sauce for a novel take on an old college goodie.
7. Don't mind a dirty microwave caked in God-only-knows-what.
8. You cook gigantic amounts of food whenever making a recipe so that there are leftovers ready during busy days.
9. Eat to procrastinate doing homework.
10. Day dream about the fabulous kitchen you will have someday and all of the fabulous food you will make in it as your are eating all of the ambiguous "food" above...


... that is if you get lucky enough to land a job that actually pays you back of course :D


Now, back to work!

Friday, April 15, 2011

Sticky Rice

Today is the third day of perhaps the most quintessentially Thai holiday- "Songkran" or New Year!  Part of the celebration includes a gigantic water fight in the public streets with super-soakers and water balloons from what I'm told (sounds way better than sipping champagne at midnight)!  Another way of celebrating the New Year includes preparing a traditional dish that is one of the most intoxicating treats a human can ask for. It is called "sticky rice" and served with fresh mango. The recipe to follow was given to me by my Thai friend, Jiab, who is currently working in the same research lab that I am. She continues to wow the mouths of Americans when she makes this dish (like today)! I have not tried making it myself yet, but here it is for safe keeping:


Thai-tastic!!
Picture.


Thai Sticky Rice
10 servings


6 cups sticky rice (sweet rice). Find it at your local Asian Grocery.
2.5 cups coconut cream/coconut milk
2 cups sugar
2 teaspoons of salt


Soak sticky rice in plain water overnight. Then steam the soaked rice in a bamboo steamer until the rice is cooked. While waiting for the rice, make the coconut sauce by putting all of the sugar and salt in the coconut milk, bringing to a boil and stirring until the sugar and salt is completely dissolved. When the rice is cooked (and still HOT), transfer to a mixing bowl, pour in the coconut sauce, mix well and cover. The hot rice will absorb all of the sauce in about half an hour or so.  Serve with fresh mango slices. Optional: Reserve some of the coconut sauce and drizzle over mango and sticky rice to serve. Additional note: Serve leftover sticky rice with a spicy curry for a real treat.

Wednesday, March 16, 2011

Here, Here, to Irish Cheer!

Helloooooo!!


I believe it's been 2011 for three months now and I have not added one post since bringing in the new year. Despite my crazy semester, I am determined not to let this outlet of creativity escape, so let's cheer to la vida loca and St. Patty with a suiting recipe that my family has grown quite fond of in the past few years: Irish coffees!

The handsome couple before revisiting Buena Vista in San Fran.
My mom admitted that she didn't like whiskey until drinking
these Irish Coffees in Minneapolis.

The story begins in San Francisco, California about four years back. My family was taking a trip to celebrate Mike's graduation from high school and it just so happened to overlap with my parents 25th wedding anniversary! They took a honeymoon in San Francisco and remember visiting the Buena Vista cafe overlooking Fisherman's Warf. We went there on their anniversary eve to get an Irish coffee, a drink they are quite famous for, however, my parents had to take their coffees out into the cold wind in two parts: a disposable cup with the coffee + a small plastic bottle of whisky (since Mike and I were still too young to share in the drinking atmosphere)!


A few years later on a mild June evening Mike and I decided to surprise them with a "proper"cup before going out for dinner. I bought my first bottle of Jameson. Mike did some dark coffee roasting. Sitting around a table on a slanted porch in Mike's rented house in Minneapolis, Minnesota we brought out the "surprise" and well... three hours and a few cups later we were stumbling into a cab to grab some grub to soak up the bottle of whisky in our stomachs! Now, it is a funny family drink. We made some last Christmas morning with hand-whipped Amaretto cream (Mike's creation). I introduced them to Joe on our second annual snow day (thank you Chancellor Biddy). And now, you can make them too!


Irish Coffees (Nuss Family Style)


Brew a strong pot of a dark roasted coffee
While brewing, boil hot water and pour into glasses/mugs to heat
Whip the whipped cream with sugar (and a splash of Amaretto) until it peaks
When the coffee is done, pour the hot water out of the serving glasses/mugs
Pour a shot or two of whiskey into the glasses
Scoop equal parts sugar and stir
Pour coffee until 3/4 full and stir until sugar is dissolved
Top *carefully* with the whipped cream as to not mix with the coffee
Enjoy one a cold night, or as we do, anytime you want to get giggly!

The "key" to a perfect Irish Coffee.
As some call it, "dumb blond in a black dress."
The beauty about not mixing the cream and coffee is
that they combine perfectly when sipping.
The slower you drink, the more the layers mingle.