Tuesday, November 29, 2011

High Tea Hiatus


It was an overcast Sunday afternoon. Joe and I spent the majority of it inside this tea house in west Denver. The insides of this historic brick building resonated with a family warmth. Including, of course, many amiable edibles.  


We sipped, poured, and sipped some more while listening to the din of hot kettles boiling over an old stove, the pitter patter of shuffling feet in the kitchen, and wafting chit chat from adjacent tables. We came to experience a proper "high tea," something the British are very familiar with. From what little reading I did on the subject, high tea takes place in the early evening and consists of tea and a light meal (such as meat sandwiches, shepherd's pie, fish and chips, and sweet breads to finish).  For those in the upper class, this is a light meal before a second supper later in the evening, where as for those less fortunate, it was the only evening meal eaten after returning from work.  This was a time to sit at a proper table, hence the name high tea versus afternoon tea, which is served on lower coffee tables or the like.


Our tea was make from hand-packed tea bags. I tried sage leaves, while Joe had a rare Japanese green tea variety. This Nanna sure knows her teas! With a hot pot of water on the table for refills, we happily took our time grazing on the fine assortment of all things British! You know, crustless sandwiches, scones served with a side of fresh whipped cream and jam, other sweets and fresh fruits.


We finished every last bite... except for one measly little sandwich wedge.  Go on, giggle all you like. All of that fancy eating and pinky finger raising gets tiring (not)!  This was such a special treat, I find it hard to believe that some do this daily. Why don't Americans make time to relax? No siestas, no tea time, no 2-hr lunch breaks. Perhaps we, as individuals, must try harder to channel a bit of down time into our own daily routine. Maybe it starts with something like taking a few seconds to turn away from the computer, or the mess on the floor, or the clock on the wall, and simply enjoying the warm, delicate fragrances of a cup of tea. With a lift of your pinky finger, perhaps!

Saturday, November 26, 2011

Turkey Again Soup

I went Black Friday shopping. For a bunch of kale...


Unfortunately, there weren't any big bargains to be had at the grocery store, except for frozen turkeys. Have enough of that thank you! After stuffing ourselves on Thanksgiving, there are the mountains of leftovers of turkey and other fixings to be eaten.  Again, and again, and well... I after a few monotonous meals, I made this:


I call this, Turkey Again Soup!  Instead of having turkey leftovers again, throw it all into a pot to make a wonderful bothy soup full of flavors and yummy winter vegetables.  My recipe is as follows below, but feel free to make this recipe your own.  I would even recommend throwing in some egg noodles or dumplings.  Joe and I paired with some herb-crusted focaccia. Delish. 


Heat up some oil in a large stock pot.
Saute onions, garlic, veggies, followed by
all of your leftover turkey (including the carcass)!
Add water to cover all ingredients and let
simmer up to 4 hours in order to produce
a beautiful golden broth.
Throw in some kale! Or turnip greens, collard, etc.
Let cook another 10 minutes, season with salt and pepper
and dish up some heart warming stew.

Turkey Again Soup
 Serves 8

2 Tbsp. olive oil
Leftover turkey, carcass and meat
2 carrots, diced
1/2 yellow onion, diced
4 garlic cloves, pressed or minced
2-3 large kale leaves, stems removed, roughly chopped
2 teaspoons tomato paste
Salt and pepper to taste

Heat oil in a large stockpot. Add turkey, veggies, garlic, parsley, and tomato paste. Saute for 10 minutes or until golden brown, stirring occasionally. Add a little water and scrape any bits from bottom. Fill pot with cold water, covering carcass, and bring to a boil, then simmer for 4 hours. Remove carcass and keep remaining ingredients in pot. Add leafy greens to pot and simmer 10 minutes. Season to taste with salt and pepper.

Friday, November 25, 2011

A Berry Sweet Birthday

In addition to usual indulgent celebrations that encompass the Thanksgiving holiday, it was Joe's birthday!  Instead of sticking candles into a pumpkin pie, I tried to make something he would truly love.  This man adores raspberries, with fond memories of picking them from his grandmothers' gardens in Slovakia. So I decided to make those tart little berries into something grand that would separate birthday from holiday. A Double-Decker Raspberry and White Chocolate Cheesecake perhaps?

He liked!

This cake requires patient preparation of many ingredients, but keep in mind that the end result is worth every minute. If you enjoy spending time in the kitchen, this recipe is an excellent way to spend a lazy weekend morning with a fresh pot of coffee.  I have posted the link for the recipe below, but use the following pictures to help guide yourself through the written directions.

Cheesecake Part 1: Making the crust.
You need chocolate wafers and butter. Don't forget your handy dandy food processor! It will make things much much easier.

Simple crust ingredients.
Double layer of aluminum foil surrounds this cheesecake pan. 
Process the cookies into crumbs, then pulse the crumbs with
melted butter until evenly moist.
My batch needed a bit of stirring, as the dry crumbs
hid at the edges of the processor bin. 
Carefully press into the bottom of the pan and bake.
Crust = done.

Cheesecake Part 2: Preparing "the goods."
Real raspberries and white chocolate are the two ingredients that make this recipe so exceptional! To melt your chocolate without burning it, put water in a pan and bring to a simmer. Place a smaller pan containing your chocolate on top of the water and watch it melt to perfection. As for the berries, frozen work just fine! The recipe asks you to process/blend the entire bag, however, you really only need 1/2 cup of the drained output. Therefore, I would recommend only processing half of them, that way you can save the rest for smoothies, or perhaps another cheesecake!

I processed my raspberries while they were still frozen.
They were easier to work with, in my opinion, since there
is less juice slashing and dripping everywhere.
You only need 1/2 cup of blended, drained raspberries.
I'm going to make some raspberry ice cream with the extra berries!

Cheesecake Part 3: Creaming the cream cheese
Cream cheese is the heart and soul of cheesecake. This recipe requires 4-8 oz. boxes of the stuff. I tried substituting half with the "1/3 less fat" variety.  The texture was still thick and creamy (sometimes lesser fat products can screw up things in ways you never expect).  Other ingredients are as shown below, such as flour, sugar, whipping cream, eggs, and vanilla and almond extracts.  First, a basic sweet cream cheese batter is prepared, followed by separation into two bowls for the two layers of flavors.

A large bowl is needed to make the basic filling batter
using all of the ingredients EXCEPT almond extract.
Carefully portion 2 1/4 cups of the basic creamy batter
to a second large bowl.

Now that the basic batter is in two bowls, it is time to stir in "the goods" to create two separate flavors that will become unique cake layers: white chocolate and raspberry.

The melted white chocolate was stirred into the batter on the
left, while the pressed raspberries PLUS the almond extract
were stirred into the batter on the right. 


Cheesecake Part 4: Bake the cake
The flavors are baked separately, all while resting the cheesecake pan in a water bath. I used my turkey roasting pan for this. First batter up: raspberry! Then for the home run, the white chocolate mixture is poured ontop and baked to perfection. 


The raspberry layer bakes about 50 min, followed
by the white chocolate layer, which bakes another 30 min.
Let this cake sit for a bit to set, then refrigerate for at least
4 hours before diving in with a knife!
For this reason, this cake is wonderful to prepare ahead of time.

Cheesecake Part 5: Grabbing a berry sweet slice.
This part needs no further explanations...

Double-decker Raspberry and White Chocolate Cheesecake

For the full recipe, click HERE.

Gobble Gobble-ing

This Friday morning, the day after Thanksgiving, has been squandered away on my couch, eating leftover turkey and stuffing with a spoon from my breakfast bowl.  Leftovers of this nature only come once a year you know.  And what a marvelous holiday it was! With coffee in hand, I am giddy to share with you the happenings of yesterday, including the second half of my turkey story.  

Thanksgiving started early for me. I was so excited I hardly slept a wink. Promises of gathering with friends and celebrating Joe's birthday consumed my thoughts, so I rose early and began to prepare the turkey.  I had been careful to plan out everything that needed to be done, including preparing the majority of the stuffing recipe the night before.  Recipes were printed and modified to account for group size,  to-do lists sketched, and supply lists carefully thought out.  


With my scatterbrained way of thinking (organized chaos is how I often like to put it) such organization measures were essential for accomplishing all of my cooking responsibilities for the day.  So with a temporary online shopping snag to purchase some pre-black friday deals, I threw on my apron and grabbed the turkey from its refrigerated slumber.  After a slight mishap of removing the neck skin (fixed by skewer suturing), this turkey was buttered, stuffed, seasoned, and contently perched on its roasting rack. 

A piece of tin foil was placed across its breast to keep the
white meat tender during the long roasting process.

By 8:45 AM, Joe and I had laced up our running shoes. We were ready to run this turkey over to the party house and then grab a spot at the starting line of a local turkey trot. Transferring a large bird by car proved to be an challenging task. I ended up sloshing chicken broth all over the inner contents of my purse and my shins in route. A fitting perfume for the day, I decided! 

Giving driving directions with a giant bird
on my lap and a can of broth between my feet.

Thanks to the gracious hosts, the turkey was placed in the oven around 11:00 AM and Joe and I returned after the race around 1:00 PM to take over the basting duties. Mostly, the afternoon hours were spent either on the couch drinking beer while watching football, or in the kitchen sipping wine while slicing yams and assembling casseroles. You can probably guess the activities I elected to be part of! 


Late afternoon, the smells from the kitchen began to draw a hungry crowd. Around 4:15 the turkey was ready for its temperature test. Both thighs read 180 degrees F, passing the exam, however the stuffing inside did not reach the 165 degree minimum. Therefore, while the bird rested, I got busy continuing to bake the stuffing from the turkey, as well as the extra stuffing casseroles I pre-prepared.


Once the turkey was transfered safely to a serving platter, the drippings from the bottom of the pan were transformed into a creamy gravy. This was done by straddling the pan across two burners and whisking in a bit of butter, flour, S&P, and more stock. Extra pepper is my secret. 

Homemade gravy divine.
I think the gravy was better received than the meat that
it accompanied!

While the cooks shuttled hot dishes to the serving area and rang the dinner bell, I had a quick moment to admire the outcome of my first turkey.  A sigh of relief! 

Soon to be carved, one last look at the golden bird.

Our feast began around 5:00 PM. The menu included more food than anyone could finish. There was a wonderful mix of modern and classic recipes, such as green bean casserole, candied yams, citrus kale salad, creamy mixed fruit...


...and desserts galore!  Among the sweet contenders, two birthday cakes for the two birthday boys present.  I made a white chocolate raspberry cheesecake in honor of Joe's birthday in the lower right corner (to be discussed in a separate post soon)!


The rest of the night was spent gobble gobble-ing and celebrating as a family away from family. 

Birthday Joe stuffed to complacency.
A very happy day indeed.

I am full of thanks for such a successful turkey outcome. The three days of preparation truly paid off. Most importantly, I am thankful for such a happy and memorable day giving thanks.  Friends and family. Great weather. Full bellies. Life, library, and the pursuit of happiness.  Man cannot live on turkey alone. 

Note, the recipes I used can be found here:  Turkey & Gravy, Stuffing

Tuesday, November 22, 2011

Happy Thanksgiving

Merry Feasting!

Nico, my incredibly lazy and hungry family cat.

Turkey Talk

Ah... the season of Thanksgiving is upon us once again.  Westerly winds have robbed the maples and oaks of their few remaining leaves, and tickled our cheeks pink while whispering promises of winter. This is the season of gathering. The harvest. A time to reconnect with people and ourselves.

There is so much to thankfulness to celebrate this year: my family and friends are healthy and happy (one of the most marvelous gifts, in my opinion).  This is also the first Thanksgiving I will share married to my college sweetheart (who just so happens to share his birthday with the holiday)!  Due to work conflicts and finances, we are staying put in Denver for our turkey feasting, to gather around a table with a handful of like-minded interns in Joe's medical program and others.  I think this holiday will be a merry one. 

That is, if the turkey turns out to be edible!  

Let me jump to the main reason for blogging today: I have turkey duty and I feel I need to engage in some turkey talk or pep talk... prep talk, perhaps!  In all honesty, I have never laid hands on a turkey. In my family, meat was most always Papa's responsibility.  Mine was pumpkin pie and playing "all-time offense" to tackle other needed kitchen duties.  Thinking back on Thanksgivings of the past, I only remember eating turkey. Not cooking it!  

Dad and brother with turkey.
Thanksgiving 2009.

So, I am giving extra thanks this holiday to the wonderful web, which enables turkey novices (like myself) the confidence to tackle the mysteries of preparing the perfect thanksgiving bird! Particularly, one of my favorites, known as Epicurious.  They have a comprehensive turkey "manual" for all things related to purchasing, brining, thawing and cooking.  

Click HERE to find this useful website.  

It was here that I pinpointed my turkey-related recipes.  Despite dozens of inventive "foodie" recipes that have evolved as hip and chic, I decided to stick to the classics.  You know, the ones with less vegetables and more butter.  Guaranteed crowd pleasers that stir up nostalgic memories of yesteryear.   My turkey-related recipes are these:  
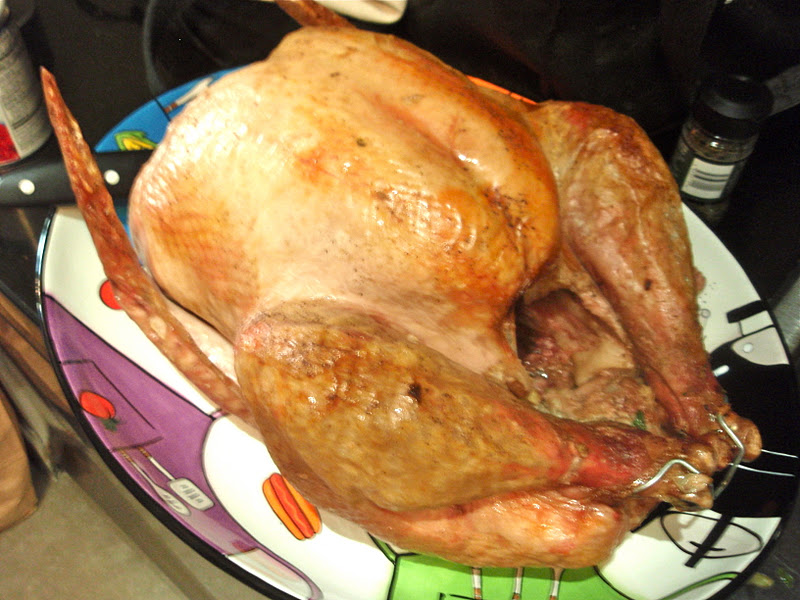
Classic Roast Turkey with Herbed Stuffing and Old-Fashioned Gravy.

Something else I had never grasped from years past, is the time required for shopping and menu planning... it about equals that of the cooking!  I had thought ahead and secured all of my ingredients, except the turkey, this past Sunday afternoon in order to avoid crowds and scanty product selection. My plan was to postpone the purchase of the turkey until the night before to avoid a crowded refrigerator.  Last night, however,  I had a panicked realization that most turkeys come frozen.  According to the experts, a frozen turkey requires 1 day of thaw time in the refrigerator for every 5-lbs of bird. YIKES!!  Doing the math, Thanksgiving is 2 days away and I was thinking about getting a 16-20 lb bird, therefore, I should have started thawing on Monday. That was a full 24 hours ago!  

I consulted my mother and cooking confidant, Emily, for some much needed advice.  Do I get a smaller bird?  Is there a way to hasten the thawing?  Oh, the drama that would unfold if half of the medical intern staff would have to call in sick because of food poisoning caused by my attempt to accelerate turkey thawing! Noooooooooooo!  I resolved, after kind reassurance, that I would simply thaw the bird in the sink as I long as I make sure to continuously change the water and check the temperature. Awww... *sigh of relief* but I couldn't waist anymore time.

Early this morning I marched off to my local grocery store to hunt for a suitable turkey.  In an ideal situation, I would have contacted a local farm and purchased a fresh turkey that was free-range and raised on organic grains (the most humane and healthiest choice).  However, time and money are big limitations this year.  Frozen isle, here I come!  From reading the Epicurious turkey bible, I gathered that I should try my best to avoid turkeys that are "self-basting" or in other words, have been injected with salt solutions.  My turkey recipe calls for a pre-roasting smothering of butter in addition to multiple basting steps.  Having injected brine could disturb the texture and flavor that the recipe intends.  As it turned out, my options for turkey came down to this:


A frozen bin full of brine-infused, far-from-natural turkeys.

Hmm... well, it wouldn't be the end of the world, I thought. Plus the price was nice. A large bird was priced around $25.  I picked up one of the generic, frozen-meat masses and headed for check out.  On my way through the store, I passed by the poultry section of the meat isle. There were 4 turkeys, neatly stacked and labeled with lots of "all-natural" jargon, but the words that hit me more than the "no fillers" was the word "FRESH." It wasn't frozen! Meaning, I would simply purchase the turkey and stick it in my fridge until Thursday morning. No messy sink and no stressful thawing countdown. But, shucks. The price was a bit steep. I better stick with the cheaper version, even if its more hassle, right? Yeah.

I continued towards the check out area, but my thoughts were now tangled: But it is Joe and my first Thanksgiving. Don't we deserve a decent turkey? I pivoted and started walking back to the fresh turkey to swap. Geez, even a cheap turkey is a decent turkey! We are already spending so much money this season with skiing and no one will know the difference between the filler injected-turkey and one without. Turned around again. Yeah, but I want to do this first Thanksgiving right!  It is probably a bad omen to eat a inhumanly sacrificed poultry on this day of humble thanks and remembrance. What would our founding forefathers do? They would eat turkeys that spent their lives happily grazing upon the natural earth underneath the sun. With that I marched right up to the frozen bin, dumped my frozen turkey out of my basket, and grabbed one of the last remaining fresh ones. My soul felt content. Man, maybe this whole living in hippy Denver thing is really getting to me? 
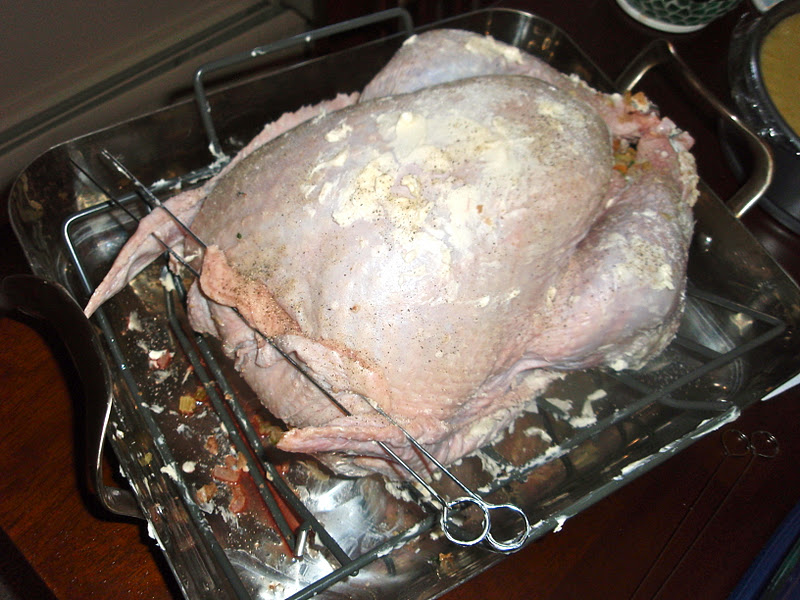
My prized bird.

As my turkey waits patiently in my refrigerator for its grand transformation into a golden centerpiece at the feasting table, I want to say "thank you" for letting me unleash some heavy turkey talk here. If you have any suggestions or similar stories, please share them with me! Best of luck to all of you other turkey goers out there! Warmest wishes to you and all of those gathered at your table for this year's thanksgiving feast. Cheers! 

Until next time... after Thursday's food hangover wears off.  

Saturday, November 19, 2011

Festive Fall Salad

Each morning when I open up my e-mail inbox, I am momentarily deceived with excitement by the lengthy list of "new" messages awaiting.  I say this because the vast majority of these messages are flowing in from foodie websites instead of personal contacts. The usual routine is to quickly flip through each of their colorful depictions of featured recipes, deleting as I go, and sometimes clicking onto their website for a period of cooking curiosity. Why do I sign up for so many of these things? I often wonder.  

The other day, however, I opened an email from the newly popular "gojee" website, which contained pictures from a recipe titled, Roasted Fall Vegetable Salad with Warm Goat Cheese and Honey Mustard Vinaigrette.  I couldn't help but be inspired to make the following salad that same day. 

And, alas, my pumpkin-inspired cooking continues... 

 Same-day media sparked dinner.

The title of this recipe is quite a mouth full, so with a few modifications (recipe below), I have dubbed this amazing dish, "Festive Fall Salad."  This recipe presents everything I love about salads, including contrasting textures, sweet dressing and savory toppings, vibrant color, and creamy cheese.  I would have loved to have used sweet red bell peppers for an extra color kick, however, they were just too darn expensive to justify. Even if you don't make this salad, bookmark this recipe for the dressing alone. It has become a quick favorite! 

Pumpkin, golden potatoes, and sweet bell peppers
are the star vegetables of this salad (sorry leafy greens).

I had never considered frying goat cheese myself, but there is nothing else like it. Warm and gooey with a crispy coating... this makes for a decadent treat!  Take caution when turning the pieces over in the oil as this cheese is extremely soft and quick to ooze. I may have had a casualty.

A small "log" of cheese was cut into thick slices
and rolled in a mixture of salted bread crumbs and flour. 
These breaded cheese pieces were then gently nestled into
a pan of hot oil until browned on each side.

After the cheese and veggies are cooked, the thing left is salad assembly. Because this dish is adorned with warm toppings, it makes for an excellent cold season salad choice.  Try pairing with toasted bread and red wine (I used homemade garlic bread and shiraz) for a meal that makes you feel as if you are dining an at intimate table with a view of a city skyline.  

Think about making this for a tasty twist
 on date night or girl's night in!

Festive Fall Salad
Adapted from LunaCafe blog
Serves 4

Salad components:
4-5 golden potatoes, washed and cut into 8 wedges each
3 cups cubed butternut squash or pumpkin, seeded and peeled, cut into large chunks
1 sweet bell pepper, washed, seeded, cut in half into thick slices
1 Tbsp. fresh rosemary (2 teaspoons dried)
2 cloves garlic, minced
2 Tbsp. extra virgin olive oil
1  teaspoon course salt, or to taste
Freshly ground pepper to taste
Mixed greens salad (about 1 large handful per serving)
1/4 cup walnuts or pecans (for garnish)
1/4 cup dried cherries or sweet cranberries (for garnish)

Cheese:
4 ounces goat cheese, 2-inch diameter log
2 Tbsp. all-purpose flour
2 Tbsp. fine dry bread crumbs
1/2 teaspoon salt
3 Tbsp. olive oil

Preheat oven to 350 degrees. Prepare the squash, potatoes and bell pepper for roasting by cutting them as specified above and  tossing in a large bowl with olive oil, garlic, rosemary and salt & pepper. Arrange these vegetables evenly on an edged baking sheet (try not to overlap pieces).  Roast for 20 minutes, or until vegetables are tender with caramelized edges.  While the veggies are roasting, prepare the vinaigrette (below) as well as the goat cheese.

To prepare the goat cheese, mix together the flour, bread crumbs and salt in a small bowl. Cut the goat cheese into thick rounds and dip each piece into the flour mixture, gently pressing down to coat well. Warm the olive oil in a non-stick skillet over medium heat and gently place the cheese pieces into the oil to cook. Saute on both sides (about 2 minutes) so that they are warmed through and browned on all edges.  The oil should sizzle a little bit, otherwise the edges will not be crispy.  When finished, place pieces onto a crumpled paper towel to remove excess oil.

Once the vegetables are finished roasting, it is time to assemble the salad. Toss the roasted veggies in some of the prepared dressing to coat. Place a handful of mixed salad greens onto a plate. Top with roasted vegetables, then nuts and dried fruit, then drizzle a bit of extra dressing to taste. Finish the presentation by crowning the dish with 1-2 fried goat cheese pieces . Sprinkle with a shake of fresh cracked pepper and a pinch of sea salt.  Serve while cheese and roasted vegetables are still warm!


Honey Mustard Vinaigrette
Makes about 1 cup

9 Tbsp. extra virgin olive oil
3 Tbsp. apple cider vinegar
2 Tbsp. honey
1 Tbsp. Dijon mustard
2 cloves garlic, pressed
1/2 teaspoon salt

Mix all ingredients together using a bowl and whisk or shake in a capped bottle until ingredients are emulsified. Stores in the refrigerator for up to 2 weeks. Try on everything!